Growing healthy cannabis seedlings comes down to getting a few fundamentals right: warmth, gentle light, careful watering, and clean conditions. The seedling stage only lasts about two to three weeks, but what happens in that window sets the foundation for everything that follows. Get it right and you'll move into veg with strong, confident plants. Get it wrong and you'll be dealing with stretched, stalled, or collapsed seedlings that never recover their potential. I've made most of the classic mistakes myself, so this guide is built around what actually works and what to watch for every step of the way.
How to Grow Weed Seedlings: Setup, Light, Water, Fixes
Marcus Holbrook
24 Mar 2026
What 'success' actually looks like at the seedling stage
Before you stress about every little thing, it helps to know what a healthy seedling is supposed to look like on a day-by-day basis. Here's the rough timeline to keep in your head:
- Days 1–5: Seed cracks, taproot emerges, cotyledons (the small, rounded seed leaves) open up and point toward the light. True leaves start forming around days 3–5.
- Days 6–9: First true leaves expand, roots push deeper into the medium, stem begins to thicken slightly.
- Days 10–14: Second node develops, internodal spacing is tight and compact, stem can support the plant without flopping.
A successful seedling at two weeks looks short, stocky, and deep green. The internodal spacing (the gap between each set of leaves) is tight, meaning the plant isn't stretching toward the light. The stem stands up on its own, the cotyledons are still intact and green (they'll yellow and drop naturally a bit later), and the growing tip looks healthy and vigorous. If your seedling matches that picture, you're doing it right. Everything else in this guide is about how to get there.
Choosing your germination method and knowing the timing
Cannabis seeds typically germinate in about 2 to 10 days depending on the seed's age, genetics, and the conditions you give them. Temperature is the biggest variable. You want things warm, ideally around 70–80°F (21–26°C), and consistently so. Cold slows germination dramatically; heat above 85°F starts to stress the seedling. The three most common germination approaches each have their own strengths.
Direct in soil or starter medium
Plant the seed about half an inch deep, pointed end down if you can tell which end is which, in a small container of moist (not wet) seedling mix or lightly amended soil. Cover with a humidity dome and put it somewhere warm. This is the lowest-intervention method and minimizes handling of the fragile taproot. It's my personal go-to for soil grows.
Paper towel method
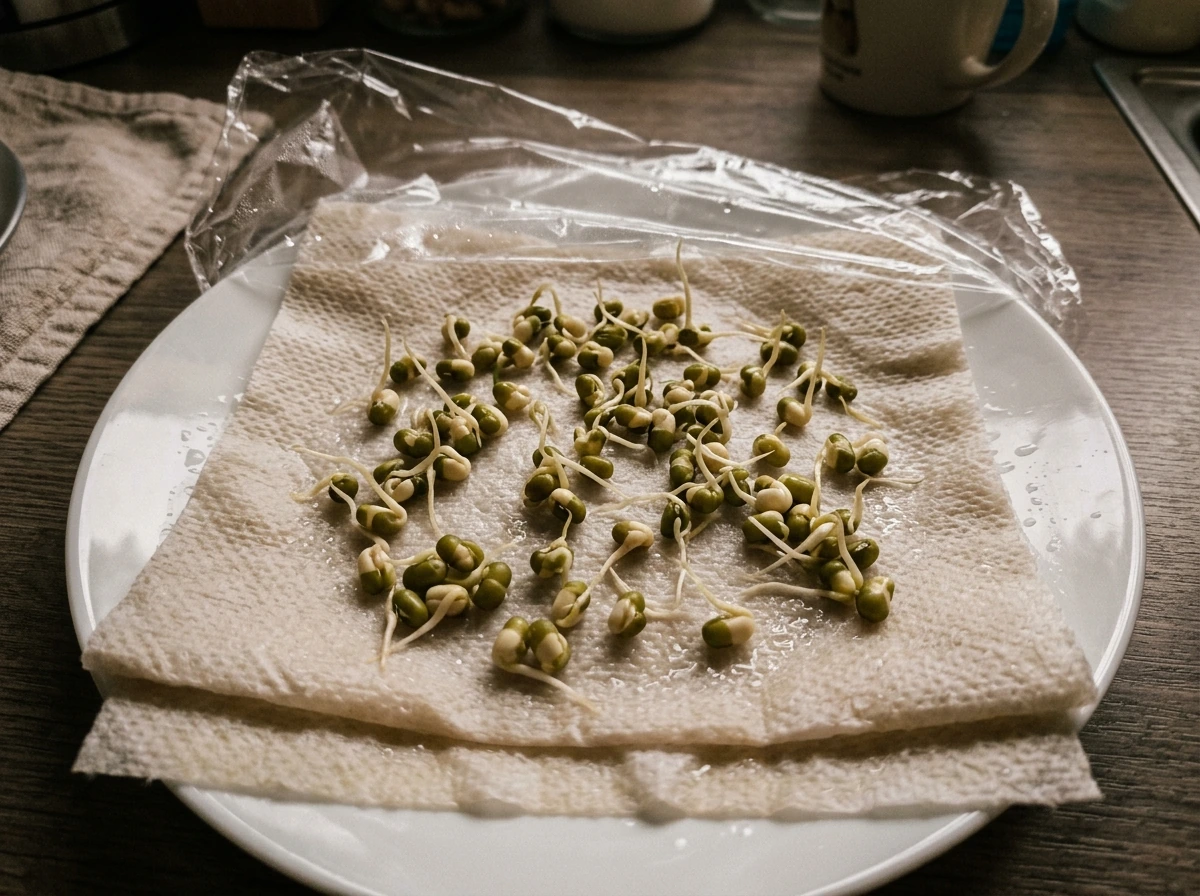
Place seeds between two damp paper towels, put them on a plate, and cover with another plate or plastic wrap to retain moisture. Keep them in a dark, warm spot around 77°F (25°C), checking daily. Once the taproot reaches about half an inch to an inch long, transfer carefully to your medium using tweezers. The paper towel method lets you confirm viability before planting, but the transfer step is risky if the root dries out or gets damaged, so move quickly and gently.
Starter plugs (rockwool, jiffy pellets, rapid rooters)
Pre-soaked starter plugs are excellent for hydroponic setups and work well for soil or coco too. They hold moisture consistently, drain well, and you plant directly into them without disturbing roots during transplant. If you're running DWC, RDWC, or any recirculating hydro system, this is the approach to use. Soak the plugs in pH-balanced water (around 5.8–6.0 for hydro, 6.0–6.5 for soil) before using them.
| Method | Best For | Key Advantage | Main Risk |
|---|---|---|---|
| Direct soil/medium | Soil and coco growers | No handling of taproot | Can't confirm viability before planting |
| Paper towel | Any medium | Visual confirmation of germination | Taproot damage during transfer |
| Starter plugs | Hydro, coco, or soil | Clean transplant, consistent moisture | Needs proper pH pre-soak |
Whichever method you choose, the most important thing is keeping the environment warm and consistently moist without being waterlogged. Seeds don't need light until they've broken the surface, so don't stress about your lighting setup during the germination phase itself.
Setting up the environment: light, temperature, humidity, and airflow
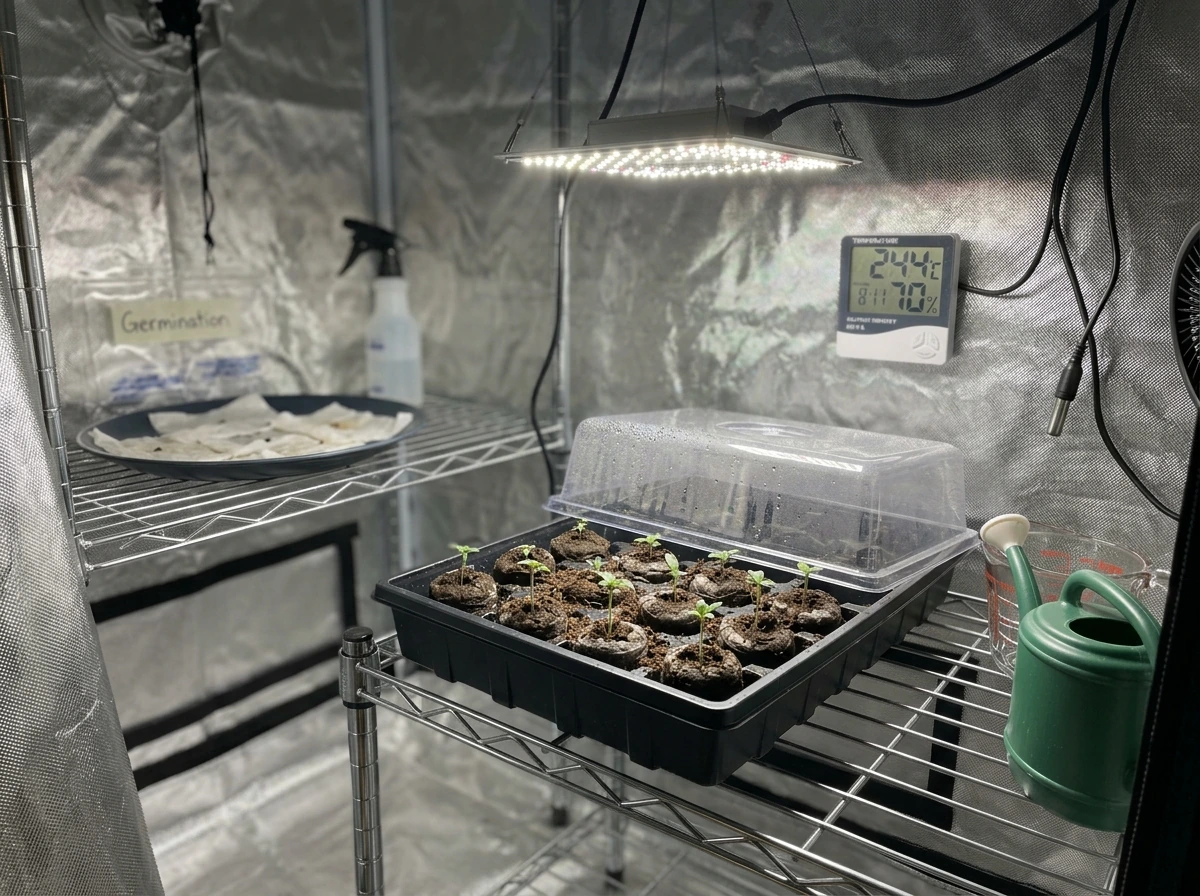
Once your seedlings break the surface, environment becomes your primary job. Get these four things dialed in and you remove most of the risk at this stage.
Light intensity and distance
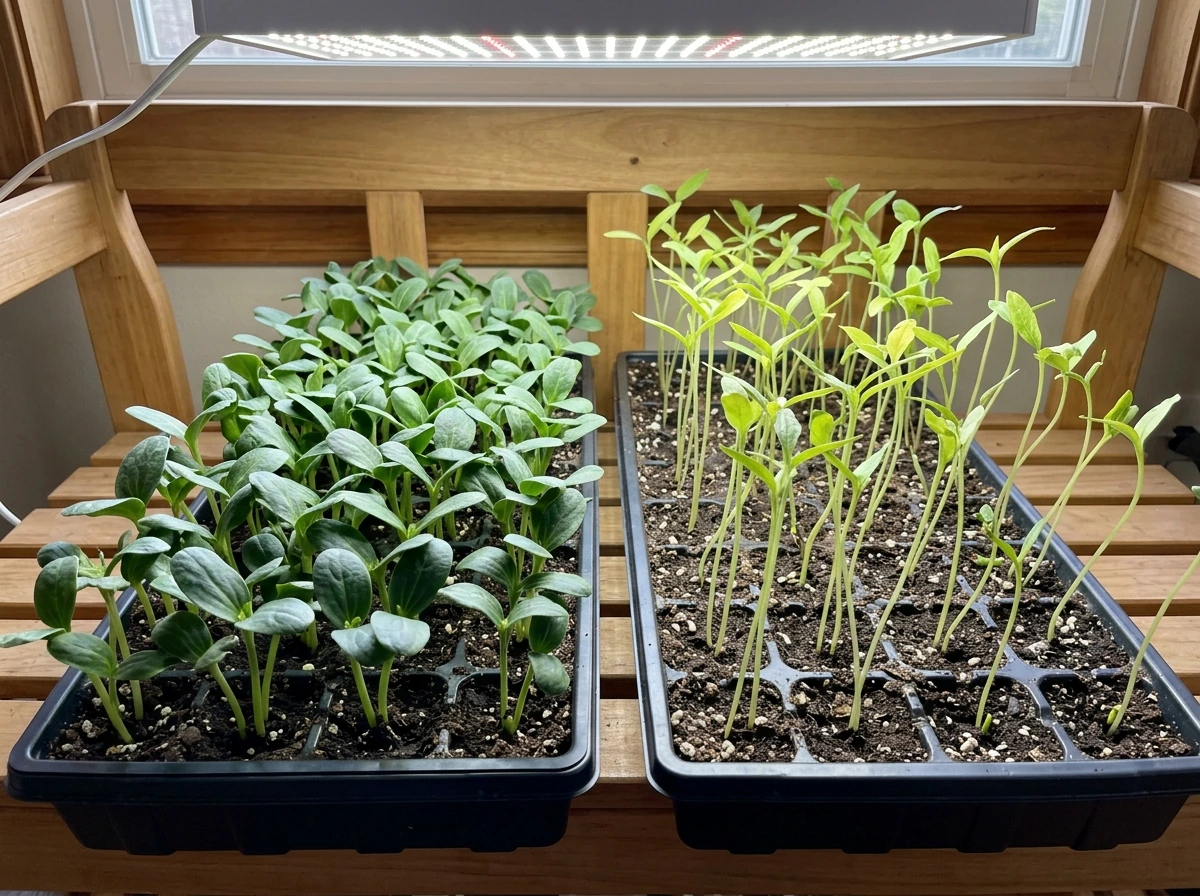
Seedlings need light, but not as much as you might think. Too much intensity at this stage bleaches and stresses them; too little causes the stretching problem we'll cover in the troubleshooting section. Target around 200–400 µmol/m²/s (PPFD) at the canopy for the seedling stage. If you don't have a light meter, use the manufacturer's recommended seedling distance, which is typically 24–36 inches for most modern LED panels at reduced power. A simple T5 fluorescent strip or a dedicated seedling LED at 18–24 inches is ideal. Run lights for 18 hours on and 6 hours off during the seedling phase indoors.
Temperature
Keep the growing area between 70–80°F (21–26°C) during lights-on. A slight 5°F drop at night is fine and actually healthy. Avoid letting temps drop below 65°F or climb above 85°F; both stall seedling development and create stress that compounds into bigger problems later. A cheap digital thermometer with a min/max memory is worth every penny at this stage.
Humidity
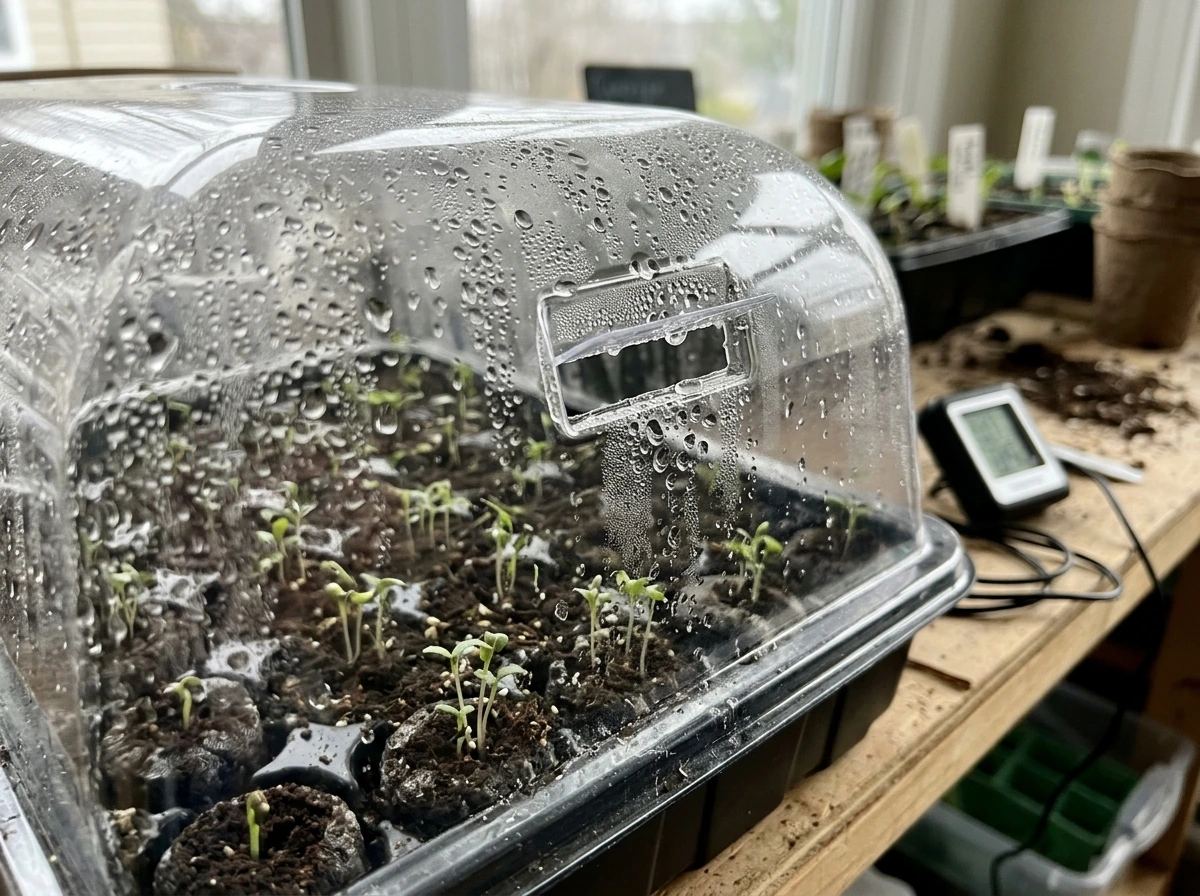
Seedlings want higher humidity than mature plants, around 65–70% relative humidity (RH), which corresponds roughly to a VPD of 0.8–1.1 kPa. A humidity dome over a seedling tray helps maintain this without running a whole-room humidifier. The important thing is to not keep it so humid that condensation pools on the inside of the dome. Heavy condensation is a warning sign of conditions that promote damping-off. Once your seedlings have their first set of true leaves, start venting the dome for increasingly longer periods each day to wean them off the elevated humidity, and remove the dome entirely once true leaves are established. From there, start bringing humidity down gradually toward 50–60% as you move into early veg.
Airflow
Light, gentle airflow does two things for seedlings: it prevents the stagnant humid air that breeds mold and damping-off, and it causes the stem to flex slightly, which actually stimulates it to grow thicker and stronger. A small fan oscillating on low, aimed not directly at the seedlings but at the surrounding air, is enough. You're not trying to blow them around, just keep air moving in the space.
Watering and medium care: the art of not overdoing it
Overwatering is the single most common mistake at the seedling stage. Cannabis seedlings are tiny, their root systems are small, and they simply cannot consume water fast. The rule I use: water only when the top inch of soil feels dry when you stick your finger in. This means you might only water every 2–3 days in a small container, and that's completely normal.
When you do water, use room-temperature, pH-adjusted water (6.0–6.5 for soil, 5.8–6.2 for coco or hydro media). Water lightly around the base of the seedling, not by drenching the whole pot. A small spray bottle or a squeeze bottle with a narrow tip gives you the control you need. The goal is to keep the medium consistently moist in the root zone, not saturated. If your medium stays wet for more than 3–4 days without drying out, it's either too big a container, too dense a mix, or you're watering too much.
Avoid nutrient-heavy feeding during the first week to ten days. Most quality seedling mixes and coco starters have enough available nutrients to get through early seedling development without any supplements. Introducing a full nutrient solution too early causes nutrient burn, which shows as brown, crispy leaf tips. If you're growing in a completely inert medium like plain rockwool or plain coco, introduce a very light nutrient solution (around 25% of the recommended seedling dose) around day 7–10 once the seedling looks established.
Mold and algae on the soil surface
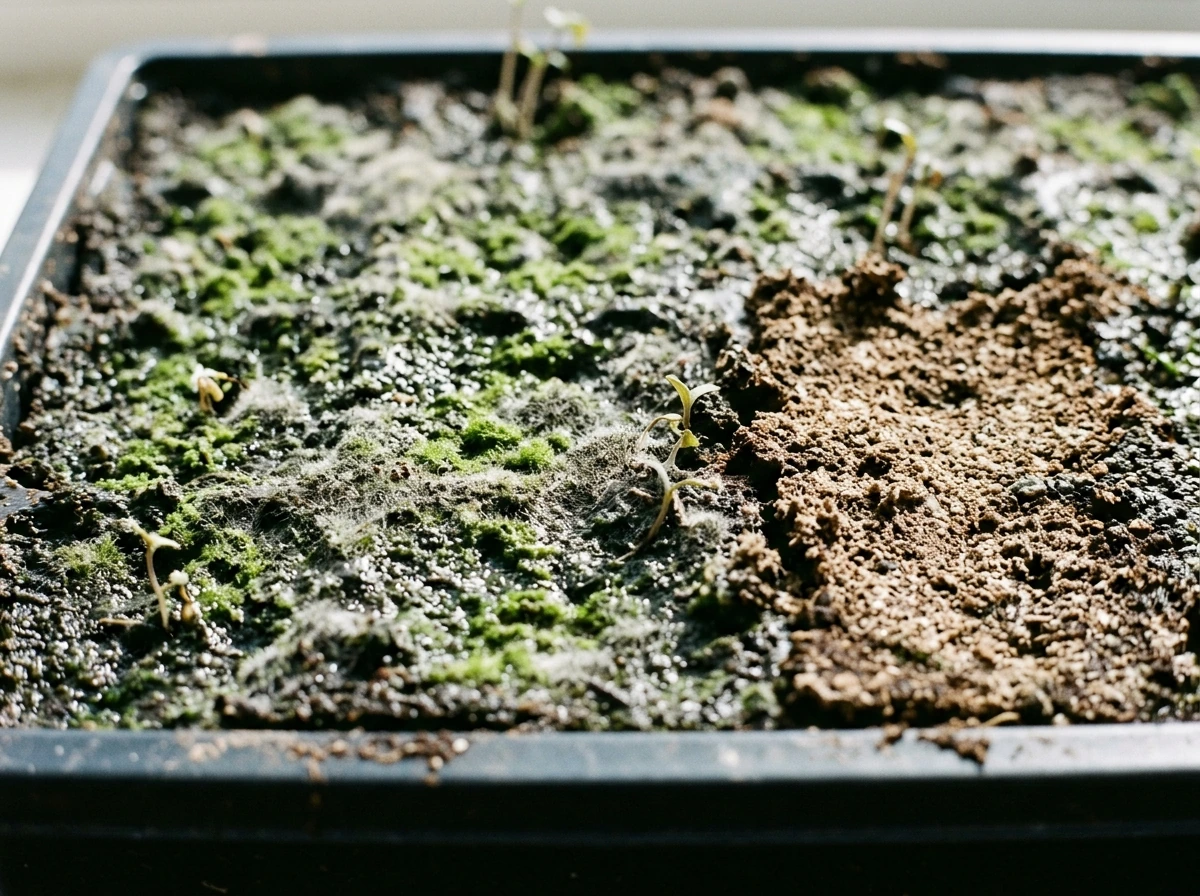
If you see green or white patches forming on the surface of your growing medium, that's algae or surface mold, and it means your medium is staying too wet for too long. It also means light is hitting the wet surface, which drives algae growth in particular. Let the surface dry out between waterings, reduce any dome condensation, and if needed, cover the top of the medium with a thin layer of dry perlite to break the moisture-to-light connection.
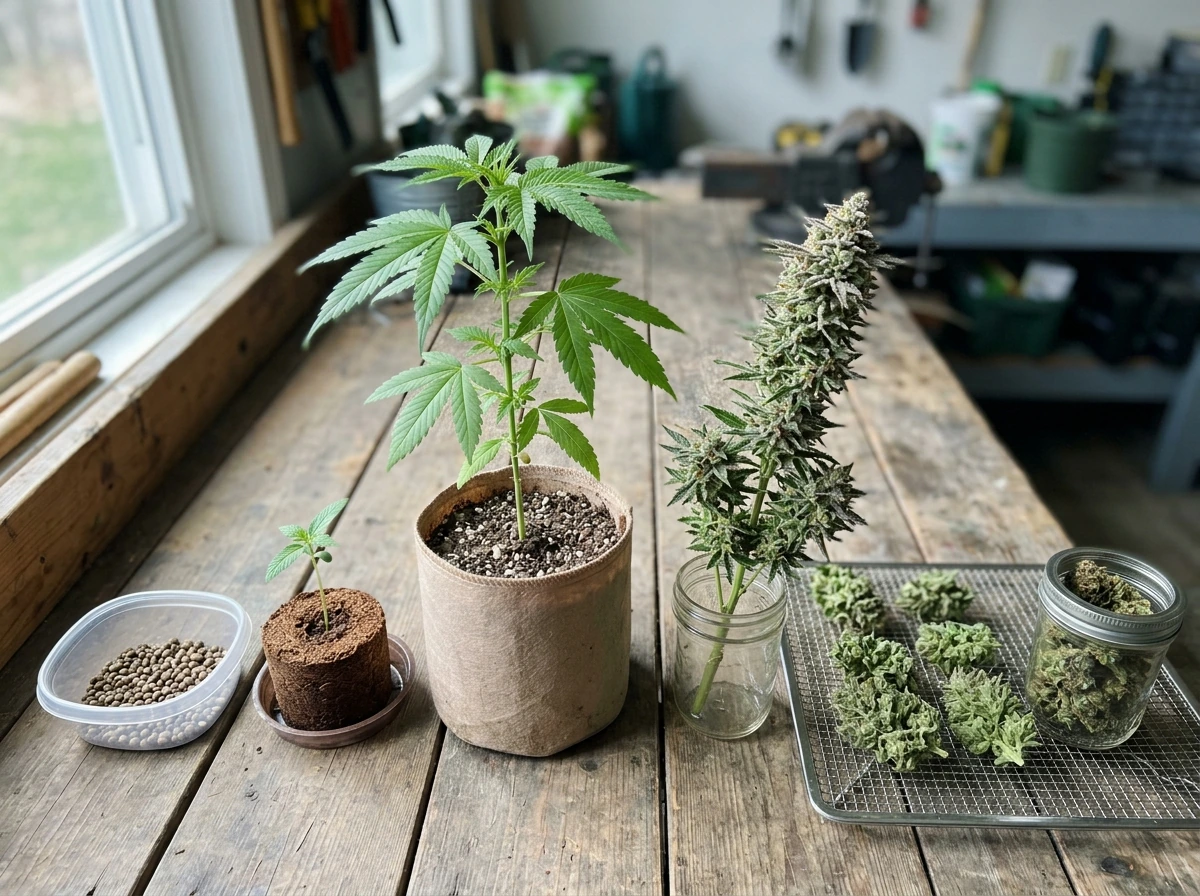
Transplanting seedlings: timing and technique
The general signal to transplant is when your seedling has developed two to three sets of true leaves, which typically happens around two to three weeks after germination. At that point the root system is developed enough to hold the medium together during the move, and the plant is ready to take on the larger root zone it needs for veg growth.
The size jump matters too. Don't transplant a tiny seedling directly into a five-gallon container. The excess wet medium around underdeveloped roots stays saturated and invites root rot and damping-off. Start in a small container (a solo cup or a one-liter pot), then move to a one-gallon, then to your final container as the plant grows. Each step up should happen when you can see roots coming out of the drainage holes or when growth visibly stalls despite good conditions.
To minimize transplant shock, water your seedling lightly one to two days before the move so the root ball is moist but not waterlogged. When you pull it out, handle the root ball gently and avoid breaking it apart. Place it in a pre-dug hole in the new container, firm the medium gently around it, and water lightly to settle everything in place. Expect up to about seven days for the plant to fully settle after transplant. During that window, keep conditions stable and slightly more gentle: back the light off a few inches, maintain humidity on the higher end of the veg range, and don't push nutrients hard. Some temporary drooping or slowed growth right after transplant is normal.
Troubleshooting common seedling problems
Leggy, stretched seedlings
If your seedling is tall, thin, and floppy with long gaps between nodes, it's stretching for light. This is the most common seedling problem and the fix is simple: move the light closer (while staying within the safe range for your fixture) or increase the intensity slightly. For seedlings already stretched, you can bury a portion of the stem when transplanting since cannabis stems can develop roots along their length. Don't just raise the light distance further thinking more darkness helps; it makes the stretch worse.
Damping-off
Damping-off is a fungal disease that causes a water-soaked, brown, pinched lesion to form at the stem base right at the soil line. The seedling then collapses and dies, usually seemingly overnight. Prevention is everything here because there's no real recovery once it sets in. Keep your medium well-drained, avoid overwatering, use clean and sterile growing medium, ensure good airflow, and remove humidity domes before condensation becomes chronic. If you see it happening, remove the affected plant immediately to prevent spread.
Pale or yellow leaves
Pale yellow coloring on new growth early in the seedling stage is usually one of three things: the medium has no available nutrients (common in very inert or overly flushed media), the water pH is off and locking out nutrients the plant can't uptake, or the temperature is too cool and slowing all biological processes. Check your pH first, then consider a very light feeding if the medium is inert. If it's just the cotyledons going yellow after week two, that's normal senescence and nothing to worry about.
Slow or stalled growth
A seedling that just isn't moving forward is almost always a microclimate problem. Run through the checklist: is the temperature in range? Is there gentle airflow? Is watering correct (not too wet, not bone dry)? Is the light intensity adequate? Slow growth rarely has a single exotic cause at the seedling stage. Fix the environment first before reaching for supplements or additives.
Drooping or curling leaves
Drooping seedlings can mean overwatering (the most likely cause), underwatering, heat stress, or root problems. Check the medium moisture first. If the medium is wet and the plant is drooping, ease off watering and ensure the container is draining properly. If the medium is dry, water gently. Leaf edges curling upward can signal heat or low humidity; edges curling downward (clawing) often means overwatering or early nitrogen toxicity from a hot soil mix.
Nutrient burn
Brown, crispy tips on the first true leaves usually mean nutrient levels are too high for where the plant is at. This happens when growers use a full-strength nutrient solution too early, or when a soil mix is too hot (too rich in slow-release fertilizers). The fix is to flush lightly with pH-balanced water and hold off on any added nutrients until the plant looks settled and healthy. Seedlings in quality seedling mix don't need extra feeding for the first week to ten days.
Indoor vs outdoor seedlings, and a note on hydro
Growing seedlings indoors
Indoors, you control everything, which is an advantage and a responsibility. The core setup is straightforward: a small propagation area (a clone/seedling tent or a dedicated corner of your grow space), a seedling-appropriate light at 200–400 µmol/m²/s, a humidity dome or small humidifier to hit 65–70% RH, a thermometer and hygrometer, and a small fan. An 18/6 light schedule works well. Most problems at this stage come from overwatering, light that's too far away, or stagnant humid air, so keep those three things in check.
Starting seedlings for outdoor grows
If you're growing outdoors, start seeds indoors about four to six weeks before your last frost date to get a head start on the season. Keep them under indoor lights initially with the same parameters above, then begin hardening them off around week three to four: start with one to two hours of direct outdoor light per day, gradually increasing over seven to ten days before leaving them outside full-time. Sudden exposure to full outdoor sun after life under fluorescent lights will cause bleaching and stress, so the hardening process isn't optional.
Hydroponic seedlings
In hydro setups (DWC, RDWC, or nutrient film technique), starter plugs are the practical choice. Once roots emerge from the bottom of the plug, the seedling can go into the system. At that point, run a very diluted nutrient solution (around EC 0.8–1.0, pH 5.8–6.0) and keep reservoir temperatures around 65–68°F to discourage root rot. Aeration is critical in hydro from day one; make sure air stones are running adequately. The rest of the environment targets remain the same.
Simple weekly seedling checklist
- Check temperature and humidity daily; log any out-of-range readings.
- Inspect the medium moisture before every watering; water only when the top inch is dry.
- Look for damping-off signs at the stem base, surface mold or algae, and any leaf discoloration.
- Confirm light distance and intensity are appropriate; watch for stretching between nodes.
- Ensure gentle airflow is present and no stagnant pockets exist under or around domes.
- By week two, begin venting the humidity dome progressively to wean seedlings off high RH.
- At week two to three, evaluate transplant readiness based on true leaf count and root development.
Safety, legality, and responsible home growing
Before going any further, it's worth being direct about this: cannabis cultivation laws vary enormously by country, state, and even municipality. In some places, home growing is fully legal for adults; in others, it remains prohibited entirely. Always check and comply with the laws in your specific jurisdiction before starting any grow. This guide is written for legal home cultivators, and nothing here is intended as advice to operate outside applicable law.
On the practical safety side, electrical safety deserves serious attention. Grow lights, fans, humidifiers, and timers all draw power in a space that often involves water and humidity. In states like Colorado and New York, official home cultivation guidance explicitly warns that improper electrical setups are a significant fire risk. Where possible, have your electrical setup reviewed or installed by a licensed electrician, use components rated for the load they're carrying, and never run extension cords as permanent wiring. Keep water and electrical connections separated wherever you can.
Ventilation also matters beyond just plant health. Removing excess heat and moisture from your growing space isn't optional, it's a safety requirement. Stagnant heat buildup from lights is a fire risk, and persistent moisture contributes to mold problems that affect both your plants and your home. A proper exhaust fan and carbon filter setup handles both heat extraction and odor management, and it's an investment worth making even for a small seedling setup if it's going to become a permanent grow space.
Secure your grow from unauthorized access, especially if you have children or others in the home who shouldn't have access to the plants. Most legal jurisdictions that permit home cultivation also specify plant count limits and security requirements, so know your local rules and follow them.
What comes next after your seedlings are established
Once your seedlings are two to three weeks old, have two to three sets of true leaves, and are growing confidently, you're ready to move into the vegetative stage. The transition is marked by transplanting into a larger container (if you haven't already) and shifting your focus from gentle establishment to promoting strong vegetative growth. Once your seedlings are two to three weeks old, have two to three sets of true leaves, and are growing confidently, you're ready to move into the vegetative stage. The transition is marked by transplanting into a larger container (if you haven't already) and shifting your focus from gentle establishment to promoting strong vegetative growth. broader guides on how to grow weed from seed to harvest and how to grow weed from start to finish cover the full picture beyond this seedling window. how to grow weed from seed to harvest how to grow weed from start to finish cover the full picture beyond this seedling window. how to grow weed from seed to harvest. how to grow weed from weed
For feeding, if you've been in a quality seedling mix with no added nutrients, start introducing a gentle veg-stage feeding at around 25–50% of the recommended dose once you see the plant actively pushing new growth. For coco growers, bump EC up gradually from your seedling range toward 1.2–1.6 as veg progresses. For hydro growers, increase EC in increments of 0.2–0.3 per week based on plant response. Always let the plant tell you what it needs: healthy dark green leaves with no tip burn means you're in the right range.
In the first week after transplant, watch for three things: resumed growth (new leaf development resuming after a brief pause), normal turgor (leaves should look full and perky, not droopy), and roots beginning to explore the new medium (you won't see this, but consistent growth above ground tells you it's happening). If the plant stalls for more than ten days post-transplant with no new growth, revisit your environment and check for root issues. Most of the time though, a healthy seedling that's been given the right conditions will move through transplant and take off into veg without drama. That's the goal, and it's absolutely achievable with the setup described above.
FAQ
How can I tell if my seedling is “ready” for more light versus still at risk of bleaching?
Use the leaf posture and color. If cotyledons and the first true leaves stay deep green and look relaxed, the intensity is usually fine. If leaves look pale, feel oddly brittle, or the seedling “prays” downward under strong light, back off by increasing distance or reducing power for 2 to 3 days, then recheck.
What should I do if seedlings sprout but the cotyledons won’t stand up (they stay stuck or bent)?
First, avoid rewetting heavily and keep humidity steady but not condensing. If the shell is still attached, you can increase humidity slightly and use clean tweezers to gently remove the outer shell after it softens. Do not pull hard on tissue, and remove any damp dome that creates pooled condensation.
Is it okay to mist seedlings instead of watering the medium at the base?
Misting the surface can work for tiny seedlings, but it often increases algae risk and creates a consistently wet top layer. The safer approach is to water the root zone gently at the base with a narrow nozzle, then let the top inch dry between waterings.
How dry should the medium get between waterings, and what if my container never dries?
A top-inch dry test is the target, but the real issue is drainage. If your medium stays wet more than 3 to 4 days, downsize the container, switch to a lighter or less dense seedling mix, or confirm drainage holes are unobstructed. If you consistently get slow-drying despite correct watering frequency, reassess airflow and pot size too.
Can I use tap water for pH and seedlings, or do I always need to adjust?
If your tap water pH and dissolved mineral levels are inconsistent, pH adjustment helps prevent nutrient lockout and weird seedling color changes. At minimum, check pH runoff or your reservoir pH after mixing, because a seedling can look “hungry” even when nutrients are present but unavailable due to pH drift.
My seedlings are drooping. How do I quickly tell overwatering versus underwatering?
Check the medium moisture directly. If it feels wet and cool, ease off watering and ensure drainage. If it’s dry and light-weight, water lightly at the base until the root zone is evenly moist. Temperature matters too, if the room is cold the plant can droop even when moisture is correct.
Should I remove the humidity dome as soon as I see true leaves?
Remove or ventilate in stages. Once true leaves are established, you can stop the “fully sealed” dome approach, but keep humidity in the upper target range (not mid-room humidity). Start with venting longer periods, then fully remove over a couple of days so seedlings transition without sudden transpiration shock.
Do seedlings need a specific wind speed, or will any fan work?
Any movement can help, but the goal is gentle airflow in the space rather than direct blasting. If leaves are fluttering hard or the stem looks overly stressed, the airflow is too strong. Aim the fan at circulating air, keep it on low, and verify there’s no stagnant pocket where condensation forms.
What’s the best way to prevent damping-off if I keep losing seedlings?
Treat it as a “no wet, no stale air” problem. Use a clean, sterile seedling medium, avoid domes that create condensation pooling, and water only when the top inch is dry. Also remove affected seedlings immediately to reduce spore spread, and avoid reusing trays without cleaning.
When do I start feeding, and how do I avoid nutrient burn in inert media?
Inert media feeding should wait until the seedling is established, then start around day 7 to 10 at about a quarter-strength. Watch for brown, crispy tips on new growth, if that appears, stop feeding and run pH-balanced water to reset, then wait for new healthy growth before trying again.
Can I transplant straight from the germination container into my final pot?
It’s usually better not to. Jumping from a tiny germination setup into a large container often leaves too much wet medium around undeveloped roots, increasing root rot and damping-off risk. Step up container size gradually and transplant when you have two to three sets of true leaves and stable growth.
How long should I wait after transplant before worrying?
A brief pause is normal, up to about seven days for settling. If you see no resumed growth and no new leaf development after roughly ten days, that’s the time to re-check environment first (temperature, light distance, airflow, and watering) and then consider root or medium issues.
What should I do if my seedlings are stretching even though I think the light is on?
Stretch usually means insufficient effective intensity or excessive distance. Move the light closer within the fixture’s safe range, or increase power slightly if your setup allows. Avoid simply raising darkness or lowering light schedule, darkness tends to worsen the stretch signal.
For outdoor seedlings, when is the right time to start hardening off, and what mistake causes the most stress?
Start hardening around weeks three to four before full-time outdoor exposure, when seedlings are strong enough to handle direct sun for short periods. The biggest mistake is jumping from indoor fluorescent conditions straight to full outdoor sun, causing bleaching and leaf stress. Increase exposure gradually over about a week.
Next Article
How to Grow Weed: Step-by-Step Seed to Harvest Guide
Seed-to-harvest step-by-step cannabis growing guide for beginners, including indoor, outdoor, and hydro tips plus troubl