If you're holding a bud and wondering whether you can grow a plant from it, the honest answer is: it depends entirely on what's inside that bud. Most dried cannabis flower you buy or find today is seedless, which means there's nothing to germinate. But if your bud does contain seeds, and those seeds are mature and viable, you absolutely can grow cannabis from them. This guide walks you through figuring out exactly what you have, what's actually possible, and how to go from that starting point to a living, thriving plant.
How to Grow Weed From Weed: From Bud to Seedling Steps
Marcus Holbrook
24 Mar 2026
What 'grow weed from bud' can mean (and what's actually possible)
The phrase 'grow weed from bud' covers a few very different scenarios, and mixing them up is where most beginners get stuck. Let's sort them out clearly.
Scenario one: your bud contains seeds. This is the most realistic path to growing a new plant from existing bud. If you have a seeded bud and those seeds are mature, you can germinate them and grow full plants. This is what the bulk of this guide covers.
Scenario two: your bud is seedless. Most retail cannabis, including dispensary flower, is intentionally grown as sinsemilla (Spanish for 'without seed'). These buds are harvested from unfertilized female plants and contain no seeds at all. You cannot grow a plant from a seedless bud. Full stop. There is no cutting, soaking, or technique that changes this biological reality.
Scenario three: you want to take a cutting from a living plant. This is cloning, and it is one of the most reliable ways to reproduce cannabis genetics. But it requires access to a living mother plant, not dried flower. A dried, cured bud has no living tissue and cannot produce roots or shoots under any conditions.
Scenario four: your bud has seeds but they look underdeveloped, pale, or greenish. These are likely immature seeds that either won't germinate at all or will produce weak seedlings. Viability testing (covered in the next section) helps here.
One more thing worth flagging: even seeded buds from unknown or stress-induced sources (like a hermaphrodite plant that self-pollinated) carry genetic instability. Plants grown from those seeds are more likely to go hermaphrodite themselves, which can ruin a crop. Bred, stable feminized or regular seeds from a reputable source are always the cleaner starting point if you have the option.
How to check if your bud has viable seeds
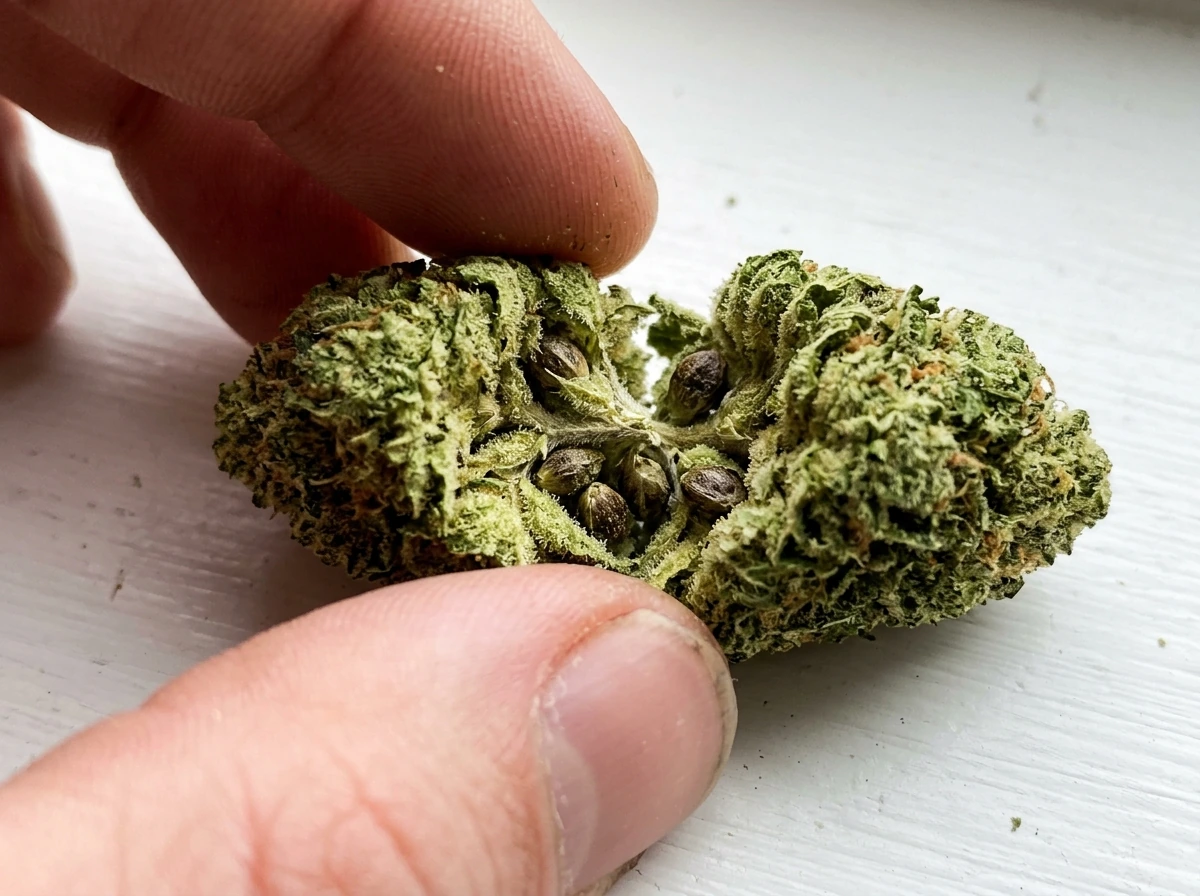
Before doing anything else, crack open your bud and look carefully. A mature, potentially viable cannabis seed has specific characteristics that are easy to spot once you know what to look for.
Signs of a mature, viable seed
- Dark color: mature seeds range from light brown to dark brown or black, often with tiger-stripe or mottled patterning
- Hard shell: squeeze it gently between your fingers. A viable seed resists compression and feels solid
- Waxy coating: a healthy seed has a slight sheen to it
- Symmetrical teardrop shape: it's plump and rounded, not shriveled or flat
- No cracks or splits in the outer shell
Signs a seed is probably not viable
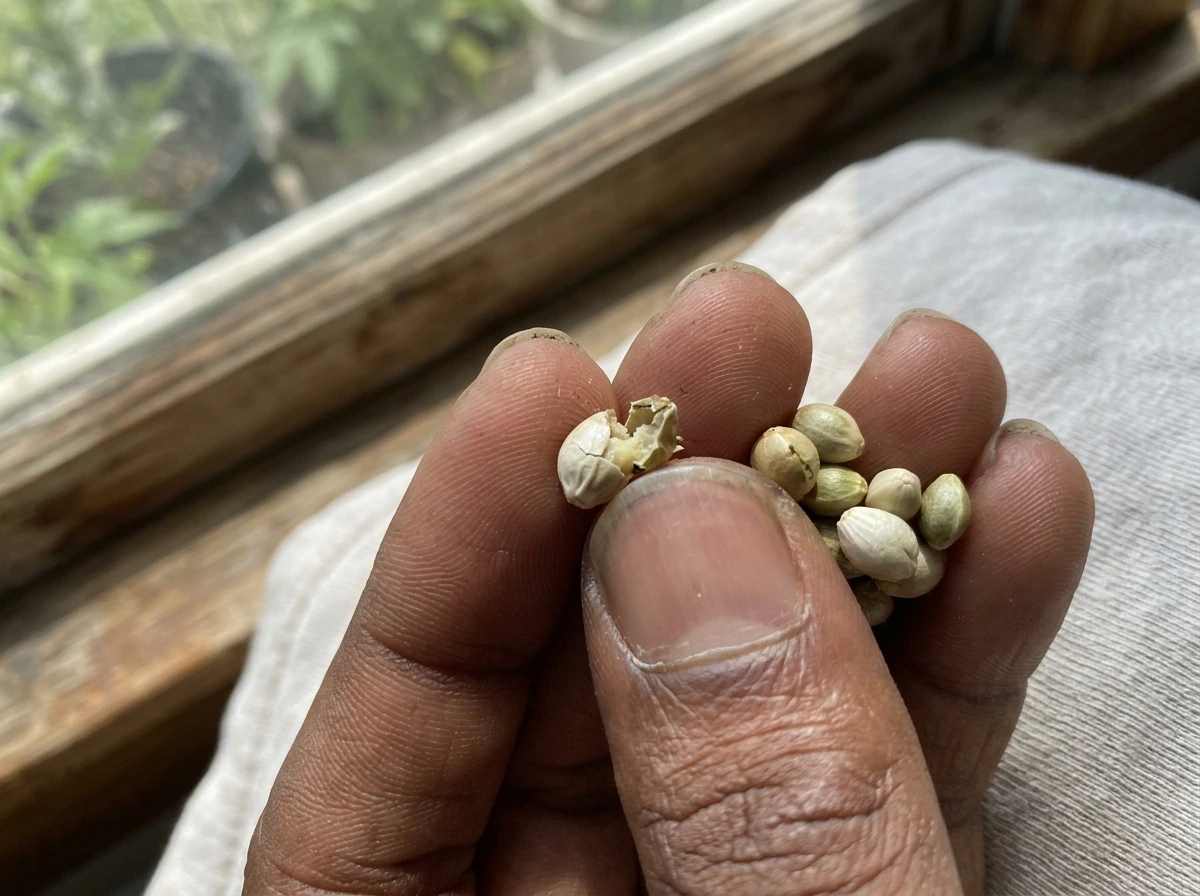
- Pale green, white, or very light tan color (immature)
- Soft or crushes easily under light pressure
- Visibly cracked or broken shell
- Very small and shriveled compared to others in the same batch
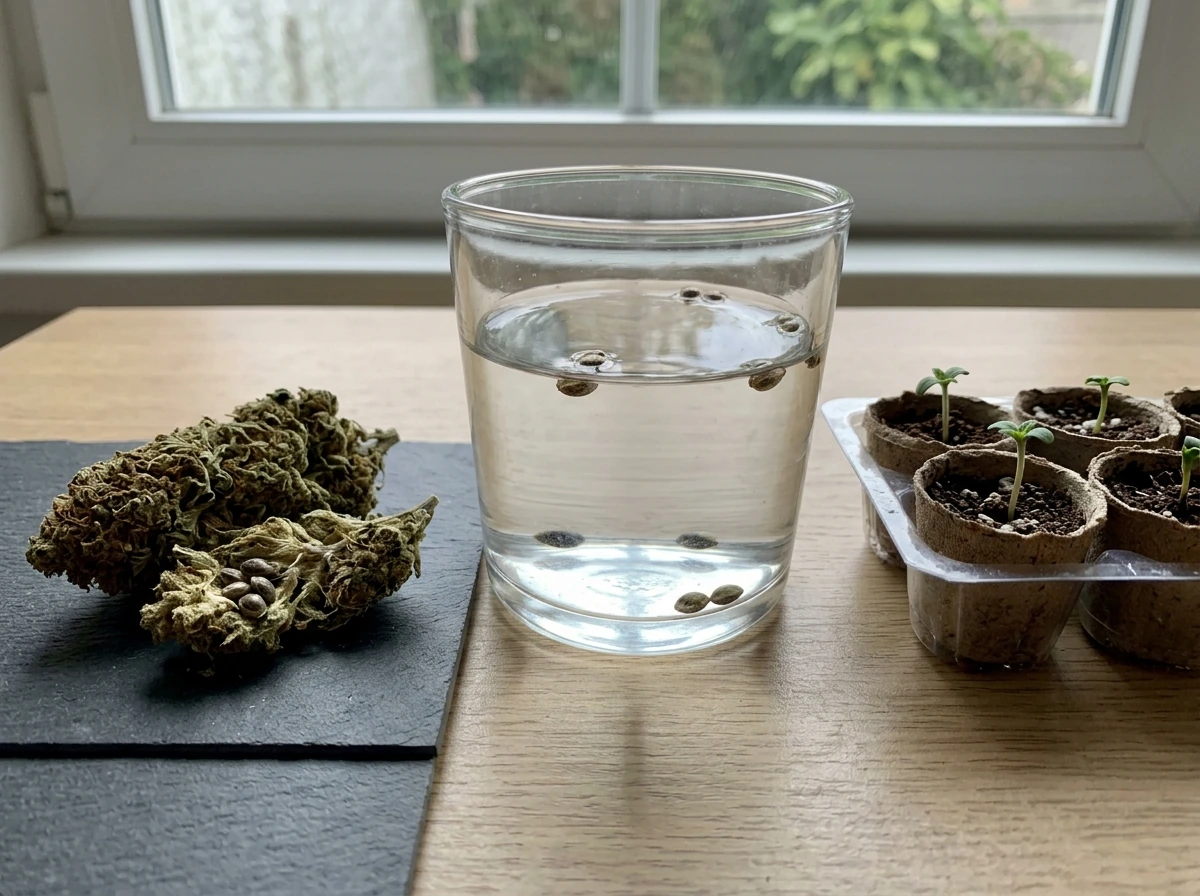
The float test
Fill a glass with room-temperature water and drop your seeds in. Wait 1 to 2 hours. Seeds that sink are dense and likely viable. Seeds that float after 2 hours are usually hollow or immature and probably won't germinate. This test is not 100% definitive, but it's a reliable quick screen before you commit space and time. Use the float test seeds immediately after rather than letting them dry out again.
If you pull out even one or two dark, hard, symmetrical seeds from your bud, it's worth attempting germination. Germination rates from bag seed vary widely (anywhere from 30% to 80%), so starting multiple seeds at once gives you better odds of ending up with at least one healthy plant.
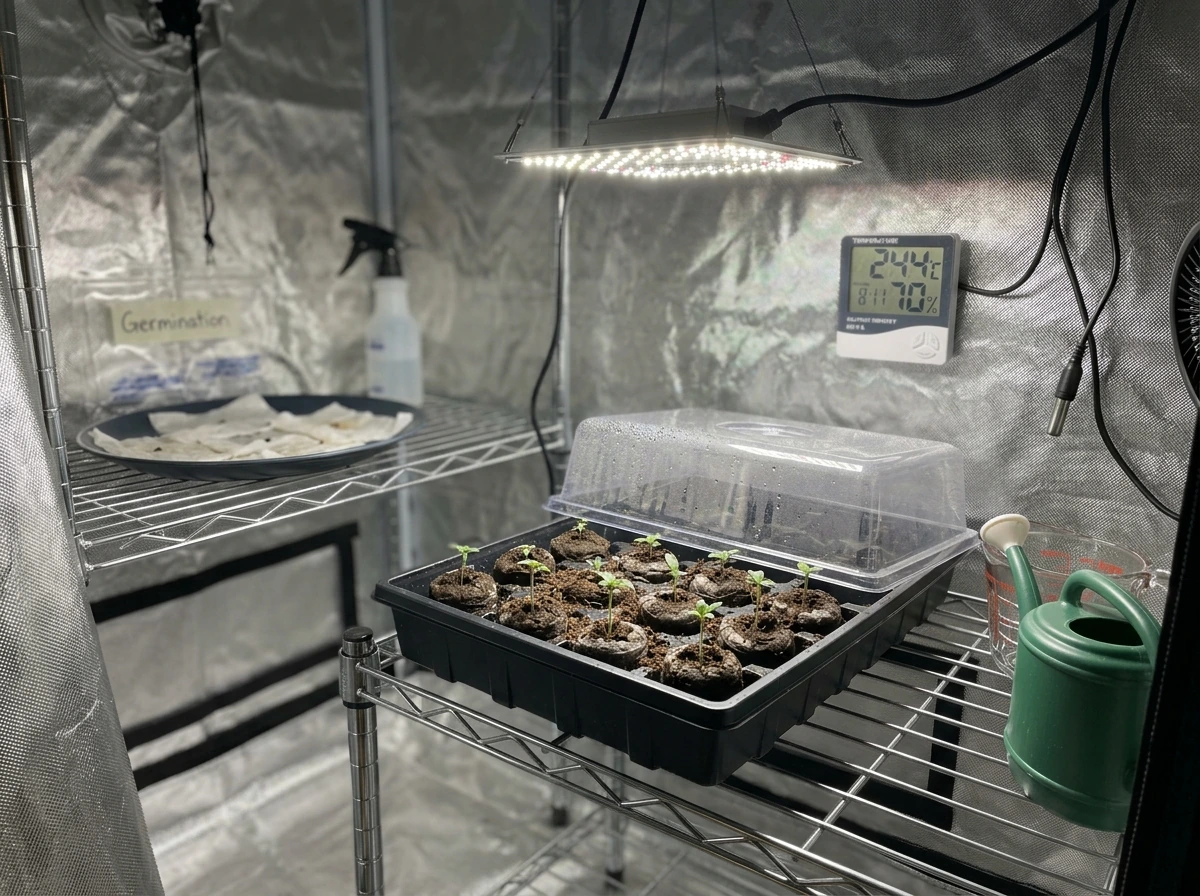
Germination and seedling setup
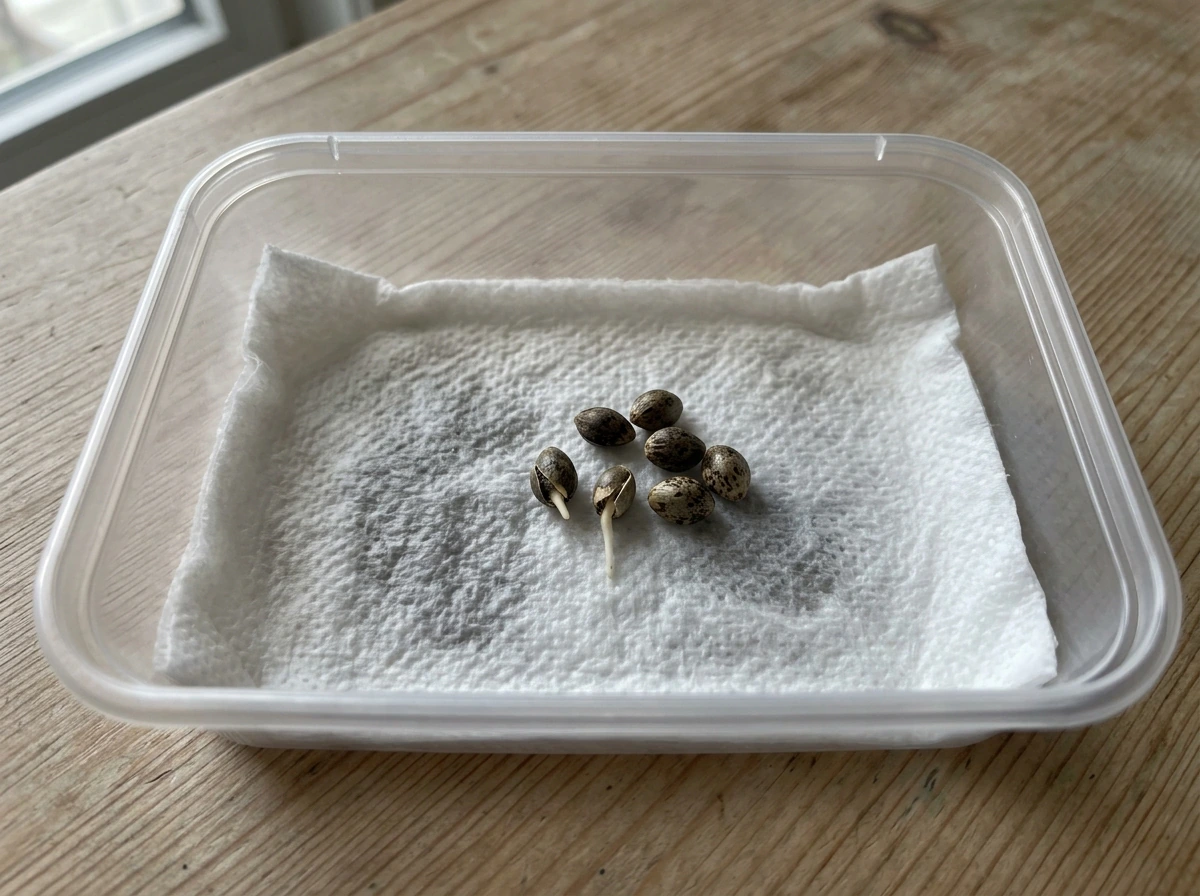
Germination is the process of getting your seed to crack open and send out its first root (called the taproot). There are several methods, but the paper towel method is the most beginner-friendly and gives you visual confirmation that germination is actually happening.
Paper towel germination: step by step
- Moisten a paper towel with plain, pH-neutral water (pH 6.0 to 6.5). It should be damp, not dripping wet
- Place your seeds on one half of the paper towel and fold the other half over them
- Put the folded towel inside a sealed zip-lock bag or between two plates to retain humidity
- Store in a warm, dark spot (a cupboard near an appliance works well) at 70 to 85°F (21 to 29°C)
- Check every 12 to 24 hours. Re-moisten if the towel starts to dry out
- Most viable seeds crack and show a taproot within 24 to 72 hours. Some take up to 5 days
- When the taproot is about 0.25 to 0.5 inches (6 to 12mm) long, it's ready to plant. Don't wait much longer or the root may tangle in the towel fibers
Planting the germinated seed
Use a small container (3 to 4 inch pot or a solo cup with drainage holes punched in the bottom) filled with a light, airy seedling mix. Pre-moisten the medium before planting. Make a small hole about 0.5 inches (1.2cm) deep, place the seed taproot-down, and cover it gently. This is an essential step in how to grow weed seedlings. Don't compact the soil. The seedling will push up through the surface within 1 to 4 days.
Environmental targets for seedlings
| Parameter | Target Range | Notes |
|---|---|---|
| Temperature | 70 to 80°F (21 to 27°C) | Avoid temperature swings above 10°F between day and night |
| Relative Humidity | 65 to 75% | High humidity reduces seedling moisture stress through leaves |
| Light Cycle | 18 hours on / 6 hours off | Seedlings need long days to stay in vegetative growth |
| Light Intensity | Low to moderate | Keep CFL or LED panels 4 to 6 inches above seedlings; avoid intense direct light |
| Watering Frequency | Every 2 to 3 days | Water in a ring around the seedling, not directly on the stem |
A humidity dome over your seedlings for the first week helps maintain moisture without overwatering. Seedlings absorb most of their early moisture through the leaves and cotyledons before the root system develops. I made the mistake of overwatering my first seedlings constantly and wondering why they looked terrible. The soil should dry slightly between waterings so the roots have reason to reach outward.
Growing on: the vegetative stage
Once your seedling has its first set of true leaves (usually the serrated fan leaves you recognize as cannabis), it's entered the vegetative stage. This is when the plant builds structure: roots, stems, branches, and the leaf canopy that will later support buds. The veggie stage typically lasts 4 to 8 weeks for most indoor grows, though you control the length by managing the light cycle.
Environmental targets for veg
| Parameter | Target Range | Notes |
|---|---|---|
| Temperature (lights on) | 70 to 85°F (21 to 29°C) | Upper end for faster growth; stay below 90°F |
| Temperature (lights off) | 60 to 70°F (15 to 21°C) | No more than 10 to 15°F drop from lights-on temp |
| Relative Humidity | 50 to 70% | Slightly lower than seedling stage; still moderately high |
| Light Cycle | 18 hours on / 6 hours off | Maintains vegetative growth in photoperiod strains |
| CO2 (ambient) | 400 to 700 ppm | Normal room air is fine; supplemental CO2 is optional |
Good airflow is critical in veg. A small oscillating fan creating gentle movement across your plants builds stronger stems (a process called thigmomorphogenesis, if you want the technical term) and prevents hot/humid pockets that breed mold and pests. You don't want a hurricane in there, just a light, consistent breeze.
Transplant your seedling from its starter pot into a larger container (typically 1 to 3 gallon) once roots start coming out of the drainage holes or you see the plant becoming root-bound. Cannabis generally loves slightly acidic growing conditions: target a root-zone pH of 6.0 to 7.0 in soil, or 5.5 to 6.5 in coco coir and hydro systems.
Transitioning to flowering: light schedule, training, and timing
Cannabis is a photoperiod plant by default, meaning it switches from vegetative growth to flower production when the daily light period drops to 12 hours or less. For indoor growers, you trigger flowering deliberately by changing your timer from 18/6 to 12/12. Outdoors, this happens naturally as days shorten in late summer.
There's one important exception: autoflowering strains flower based on age (usually 3 to 5 weeks from germination), not light cycle. If your seed came from an autoflowering plant, don't worry about the 12/12 flip. Autoflowers run on their own clock. If you're not sure whether your bag seed is auto or photoperiod, assume photoperiod and watch for signs. An auto will start showing white pistils (hairs) at the nodes even under 18+ hours of light.
Training your plant before the flip
Training techniques encourage wider, bushier plants that produce more bud sites and use light more efficiently. For beginners, low-stress training (LST) is the easiest starting point. You simply bend and tie branches outward and downward to expose the inner canopy to light. Start this around week 3 to 4 of veg when stems are still flexible.
- LST (Low-Stress Training): bending and tying branches, no cutting required, good for beginners
- Topping: cutting the main growing tip to encourage two main colas instead of one, done at the 4th or 5th node
- ScrOG (Screen of Green): weaving branches through a horizontal net to create an even canopy, ideal for maximizing indoor yields
- Lollipopping: removing lower growth that won't get enough light, redirecting energy to upper bud sites
Once you flip to 12/12, most photoperiod strains show sex (pistils for female, pollen sacs for male) within 1 to 2 weeks. After that, flowering runs 7 to 11 weeks depending on strain. The total timeline from seed to harvest indoors is typically 3 to 5 months. If you started from seeds found in bag weed, your timeline sits in the same range, though unknown genetics means you're estimating more than someone who bought labeled seeds.
Nutrients and watering: soil, coco, and hydro
Cannabis nutrition follows a general pattern: nitrogen (N) dominates in veg, then phosphorus (P) and potassium (K) take over in flower. Getting that macro ratio right across growth stages matters more than any other nutrient decision you'll make.
Growing in soil
A quality pre-amended potting mix (like Fox Farm Ocean Forest or similar) contains enough nutrients to carry seedlings and early-veg plants for 3 to 4 weeks without any added fertilizer. This is great news for beginners, because overfeeding seedlings is one of the most common first-grow mistakes. Start feeding at 25 to 50% of the manufacturer's recommended dose around week 3 to 4 of veg, and work up from there based on how the plant responds. Water when the top inch of soil is dry. Let pots dry out partially between waterings. Always water to runoff (about 15 to 20% drainage) to prevent salt buildup. Target pH: 6.2 to 6.8 at the root zone.
Growing in coco coir
Coco coir is an inert medium that holds nutrients and retains some moisture while draining freely. Unlike soil, it contains almost no nutrients, so you start feeding from the very first watering after transplant, though at very low doses (EC of 0.4 to 0.6 for seedlings). Coco benefits from daily or twice-daily watering/feeding as plants get larger, since it dries faster than soil. Target pH for coco: 5.8 to 6.2. Coco naturally binds calcium and magnesium, so a Cal-Mag supplement is almost always required.
Growing in hydro
Hydroponic systems (DWC, NFT, ebb and flow) deliver nutrients directly to roots via oxygenated water. Growth rates are faster in hydro, but there is less buffer for error. pH must be checked daily and kept tight: 5.5 to 6.0. Seedlings started in hydro should begin with an EC (electrical conductivity) of around 0.6 to 0.8, stepping up gradually to 1.2 to 1.6 in veg and 1.6 to 2.0 in flower. Water temperature matters in hydro: keep your reservoir at 65 to 68°F (18 to 20°C) to prevent root rot.
Nutrient stage summary
| Growth Stage | N-P-K Focus | EC Range (mS/cm) | pH Target |
|---|---|---|---|
| Seedling (weeks 1 to 3) | Minimal feeding | 0.4 to 0.8 | 6.0 to 6.5 (soil/coco); 5.5 to 6.0 (hydro) |
| Early Veg (weeks 3 to 5) | High N, low P/K | 0.8 to 1.2 | 6.2 to 6.8 (soil); 5.8 to 6.2 (coco/hydro) |
| Late Veg (weeks 5 to 8) | High N, moderate P/K | 1.2 to 1.6 | 6.2 to 6.8 (soil); 5.8 to 6.2 (coco/hydro) |
| Early Flower (weeks 1 to 4) | Moderate N, increasing P/K | 1.4 to 1.8 | 6.2 to 6.8 (soil); 5.8 to 6.2 (coco/hydro) |
| Late Flower (weeks 5 to harvest) | Low N, high P/K | 1.6 to 2.2 | 6.0 to 6.5 (soil); 5.8 to 6.2 (coco/hydro) |
Troubleshooting common problems when starting from bud or bag seed
Starting from seeds found in bud introduces a handful of specific risks you don't face as often with purpose-bred seeds. Here's what to watch for and how to handle it.
Damping-off
Damping-off is a fungal condition where seedlings suddenly collapse at the base of the stem, which turns thin and brown at soil level. It's caused by excess moisture combined with poor airflow, and it kills seedlings fast. Prevention is far easier than cure. Use a light, well-draining seedling mix. Don't overwater. Remove humidity domes for a few hours each day once seedlings have their first true leaves. If damping-off strikes, there's usually no saving the affected plant, but you can prevent it spreading by improving airflow and reducing watering immediately.
Slow or failed germination
Bag seeds often have lower germination rates than bred seeds. If a seed hasn't shown a taproot after 5 to 7 days in the paper towel, it's likely not viable. Some growers try lightly scuffing the outer shell with fine sandpaper (scarification) before soaking to help moisture penetrate old or hard-coated seeds. A 12-hour presoak in pH-neutral water before the paper towel method also helps. Don't give up on seeds after day 3, but do start fresh ones in parallel if you have extras.
Hermaphrodite risk from bag seed
Seeds found in commercial bud often come from hermaphrodite plants (plants that developed both male and female flowers due to stress or genetic instability). Plants grown from these seeds carry a higher-than-average risk of also going hermaphrodite, especially under stressful conditions. Monitor plants closely during flowering for any small banana-shaped structures or pollen sacs developing among the pistils. Remove and discard any plant showing male sex organs immediately to prevent pollinating your other plants.
Mold in seedling trays
White fuzzy mold on the soil surface usually means the top layer is staying too wet for too long. Let the surface dry out more between waterings. A very light dusting of ground cinnamon on the soil surface can help suppress surface mold. Make sure your grow space has decent airflow and is not running at humidity above 75% for sustained periods.
Slow or stunted seedling growth
Seedlings from bag seed can sometimes establish slowly. Common causes include: temperature too low (below 68°F), overwatering, soil too dense or poorly draining, or a genuinely weak seed with low vigor. Check your temps first. Then check your watering habits. If the seedling is otherwise healthy-looking but just growing slowly, give it time before stressing about it. Genuine nutrient deficiencies are rare in seedlings planted in a quality pre-amended mix, but very pale, yellowing seedlings may need a very dilute feeding after week 3.
Legal, safety, and next-step decision checklist
Before you start any grow, check your local laws. Cannabis cultivation is legal in some form in many places, but the rules vary dramatically by location. In some jurisdictions (like <a data-destination-uuid="0304B51B-DC3E-4257-8921-6C9EF1E7CA69">New Zealand</a>, under the Misuse of Drugs Act 1975), growing cannabis is a criminal offense that carries real penalties including imprisonment, regardless of whether you intend it for personal use. In other places, home cultivation of a limited number of plants for personal use is explicitly permitted. It is your responsibility to know the laws where you live before you plant anything.
Even where home growing is legal, there are usually rules around plant counts, visibility, security (especially around minors), and whether you can give away or sell what you grow. Take five minutes to look up the specific rules for your area. The rest of this guide assumes you are operating within your local legal framework.
Your decision checklist based on what you actually have
- Seedless bud only: You cannot grow from this. Your options are to source feminized or regular seeds from a reputable supplier, or find a grower willing to share clones from a living mother plant
- Bud with seeds but seeds look pale, soft, or green: Run the float test and visual check. If all seeds float or crush easily, treat them as non-viable and source proper seeds instead
- Bud with one or more dark, hard, symmetrical seeds: Attempt germination using the paper towel method. Start multiple seeds at once (3 to 5 if you have them) to improve your odds. Expect variable germination rates
- Seeds that germinated successfully: Follow the seedling environment targets in this guide. Use a light seedling mix, 18/6 light schedule, 70 to 80°F, and 65 to 75% humidity. Water carefully and avoid overfeeding for the first 3 weeks
- Access to a living mother plant: Consider taking cuttings (clones) rather than germinating bag seeds. Clones are genetically identical to the mother, skip the seedling stage, and have predictable traits. This is covered in more detail in our guide to growing weed from start to finish
- Not sure if you have a photo or auto strain: Assume photoperiod. Maintain 18/6 light and watch for spontaneous flowering at around 3 to 5 weeks. If it flowers on its own, it's an auto. If it doesn't, flip to 12/12 when you're ready to trigger flowering
- Concerned about hermaphrodite risk from bag seed: Monitor all flowering plants daily for pollen sac development. Remove any suspect plant immediately and grow from purpose-bred seeds in future grows for more stability
Growing from bag seed is genuinely possible and many growers have done it successfully. The main variables are seed viability (which you test before investing time) and genetic stability (which you accept as uncertain going in). If you want more predictable results, purpose-bred feminized seeds from a licensed retailer give you known genetics, higher germination rates, and strains bred specifically for home-grower conditions. Our full guide on how to grow weed from start to finish covers everything from that seed purchase decision through to harvest if you want to dig deeper into any of these stages.
Start small, be patient with the seedling phase, and don't overcomplicate the early weeks. Most problems in early cannabis growing come from doing too much (overwatering, overfeeding, over-adjusting) rather than too little. Get your environment dialed in, and the plant does most of the work.
FAQ
Can I grow weed from a dispensary bud even if it looks fully “seedless”?
No. If the bud is truly seedless (common for dispensary sinsemilla), there are no embryos to germinate, so soaking or paper-towel techniques cannot make a non-seed become a plant. If you suspect your bud has seeds, crack it open and inspect for hard, symmetrical shapes before you waste time.
If I started germinating from weed seeds in bud, how long should I wait before assuming they will not sprout?
Start counting from when the seeds are in the germination setup (paper towel, etc.), not from when you “opened the bag.” If you do not see a taproot by day 5 to 7, odds are the seed is not viable, and it is better to begin with extra seeds in parallel rather than waiting indefinitely.
Are seeds that float in water always dead?
The float test is a quick screen, not a guarantee. Some viable seeds may float due to trapped air or surface moisture, so if you find any hard, dark, symmetrical seeds, attempt germination even if a few float.
How long should the taproot be before I move the seed into the pot?
It helps to move only once the taproot is safely established and you can plant carefully. If you let a taproot get long and delicate, it can tear during handling, which stalls or kills the seedling. Aim to plant as soon as you see a clear taproot rather than waiting for multiple centimeters.
Do I need to keep a humidity dome on the whole time, or can I transition off it?
Yes, you can. Once your seedlings have true leaves, you can remove humidity domes gradually (for example, shorter sessions and then longer ones) rather than dropping the dome all at once. This reduces shock and also helps prevent damping-off by improving airflow.
My seedlings are growing slowly, what are the most likely causes besides lack of nutrients?
If you are in soil, a common cause of slow growth is overly wet media that limits oxygen to the roots. Let the top layer dry slightly between waterings, keep gentle airflow, and verify temperature first. Nutrient problems are usually not the first explanation for early slow growth in a quality pre-amended mix.
What should I do if my seedlings start collapsing at the stem base?
If the medium is staying damp and the seedling collapses at the base, focus on stopping the cycle that causes damping-off: use a lighter seedling mix, reduce watering frequency, and improve airflow. Once a seedling is collapsed, it typically cannot be recovered, but you can often prevent spread by correcting moisture and ventilation.
When is the best time to check for male plants if I started from bag seed?
Yes, your best move is to identify sex as early as the plant shows clear indicators. For photoperiod plants, pistils and pollen sacs typically show within 1 to 2 weeks after the 12/12 light change. Remove males promptly if you want sinsemilla (seed-free flowers).
If bag seed might carry hermaphrodite risk, how do I manage it during flowering?
If the bud produced from a hermaphrodite event, you may never be able to “fix” instability once it is in your grow. The practical approach is early detection, isolate the suspect plant, and remove it if male parts appear. Continue monitoring other plants during flowering because stress later can trigger expressions.
When should I start feeding, and does the timing change for soil versus coco?
It depends on the medium. In soil, you should generally start feeding later (often around week 3 to 4) because the mix already contains nutrients. In coco, you usually begin with very low feed right after transplant since coco has little to no built-in nutrition.
How important is water temperature, especially if I’m growing in hydro?
Water temperature matters most in hydro, but in all grows, very cold water can slow root activity. In hydro specifically, keep reservoirs around 65 to 68°F (18 to 20°C) to reduce root rot risk. If your room is cool, use water and res temps that do not swing dramatically day to day.
Should I scarify bag seeds to improve germination, and is it risky?
Avoid scuffing seeds unless you truly need to. Scarification can help some older or hard-coated seeds, but overdoing it damages the seed coat and reduces viability. If you do it, keep it light, then use pH-neutral soaking and a consistent paper-towel setup.
How can I tell whether my bag seed is autoflower or photoperiod?
If you suspect your seed came from an autoflower, it will not respond reliably to light-cycle changes for early flowering. The most useful decision aid is observation: autoflowers often show early white pistils at the nodes even when given long light days. If you see that, keep your lighting consistent rather than flipping to 12/12 for “testing.”
How do I prevent salt buildup if I’m learning with bag seeds and might be overwatering or overfeeding?
You can reduce salt buildup by watering to a small amount of runoff each time (about 15 to 20%), then letting the pot dry slightly before the next watering. If you notice persistent edge burn, crusty soil, or drifting pH, flush appropriately and reassess how often you are feeding versus just watering.
Next Article
How to Grow Weed Seedlings: Setup, Light, Water, Fixes
Step-by-step setup, light, watering and troubleshooting to grow healthy cannabis seedlings from germination to transplan