Growing pot at home is genuinely manageable for most beginners. It is not as hard as people expect, but it is not as effortless as growing tomatoes either. The honest answer is this: if you can keep a houseplant alive, monitor a few numbers, and follow a basic schedule, you can grow cannabis at home and harvest something real. Most beginners who fail do so because they overcomplicate things or skip the fundamentals, not because the plant itself is impossibly demanding.
How Hard Is It to Grow Pot? Indoor vs Outdoor Guide
Marcus Holbrook
24 Mar 2026
On a scale from easy to hard, outdoor soil growing lands closest to easy for a first-timer. Indoor growing is moderate, mostly because you are managing an artificial environment. Hydroponics is the most technical of the three. But all three are learnable, and in 2026 there is more beginner-friendly information, equipment, and purpose-bred genetics available than at any point in history. This guide walks you through what actually determines success, so you can start with confidence and realistic expectations.
Before You Grow Anything: Check Your Local Laws
Legality is the first thing to sort out, because it varies enormously by location and the rules matter for how and where you set up. Home cultivation is legal for adults in many U.S. states but still prohibited in others, and the specifics change constantly.
A few real examples from 2026 to illustrate how different the rules can be: In Missouri, adults 21 and older can <span>cultivate cannabis at home</span> but only if they hold a state consumer personal cultivation card. The authorization allows up to six flowering plants, up to six nonflowering plants at or above 14 inches, and up to six nonflowering plants under 14 inches, all in a single enclosed, locked facility. In Nevada, home cultivation is allowed for adults who live at least 25 miles from a licensed retailer, with a limit of six plants per person and no more than 12 plants per household, details that match the topic of how to grow marijuanas in nevada. The grow must be in a secured, locked space. In Florida, a 2026 Senate bill (SB 776) would allow certain qualified medical patients to cultivate up to six flowering plants for personal use, with security requirements to prevent unauthorized access. That bill was still working through the legislature as of this writing. And in Texas, home cultivation remains fully illegal even for medical patients. The state's Compassionate Use Program runs through licensed dispensing organizations only, with no personal grow pathway, see <span>how to legally grow medical weed in texas</span>.
The pattern you will notice across all of these: plant counts are usually capped (commonly six per person), a secure and locked space is almost always required, and cardholder or resident status may be a condition. Before you spend a dollar on equipment, look up your current state and local rules. Other articles on this site dig into state-specific legal details for places like Missouri, Nevada, Florida, and Texas if you need a deeper breakdown. Once you know you are clear to grow, the practical questions start.
How Hard Is Each Growing Method?
The method you choose shapes everything about difficulty. Here is an honest comparison of the three main approaches.
Outdoor Growing
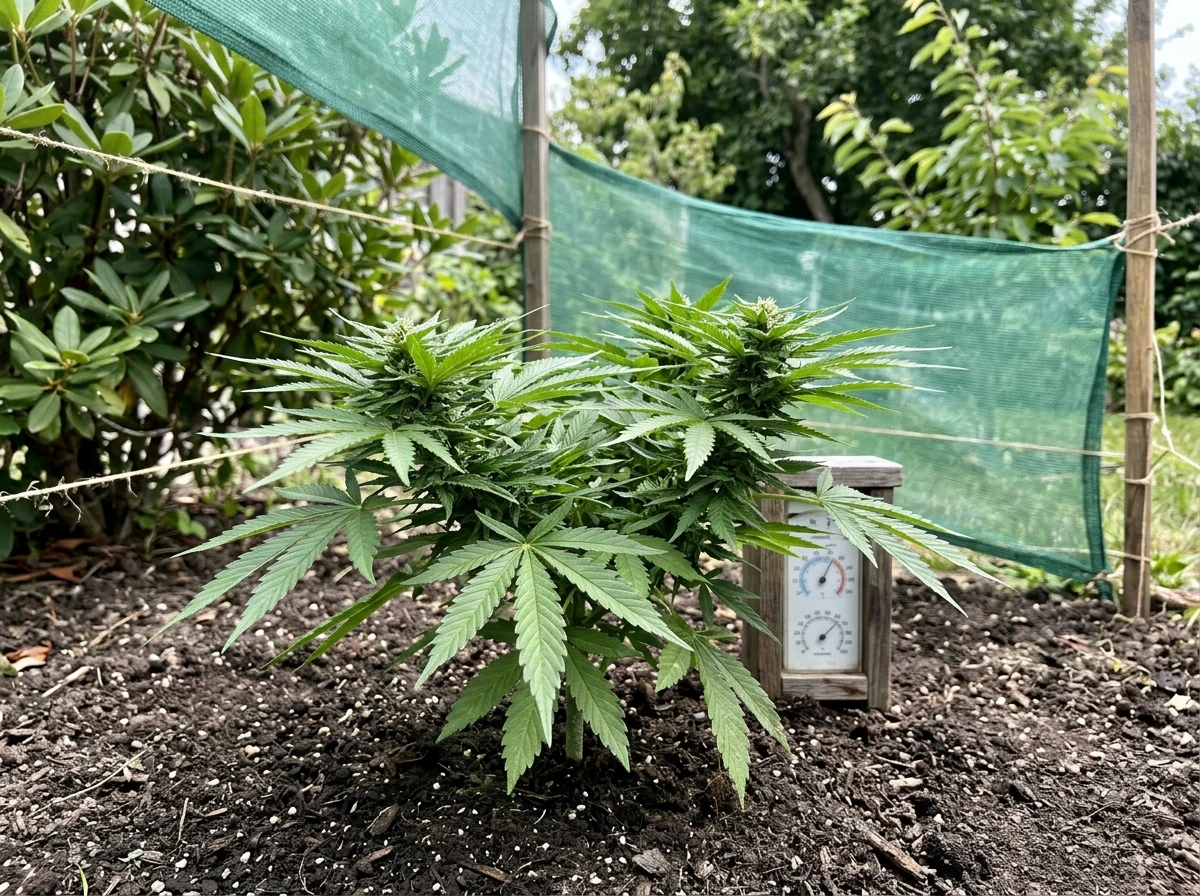
Outdoor growing in soil is the most forgiving starting point. The sun does your lighting job for free, natural soil provides a buffer of micronutrients, and the plant has more physical room to recover from mistakes. You still need to think about climate (cannabis does not love frost or extreme humidity), pests, and watering consistency, but you are not micromanaging an enclosed box of variables. If your climate has warm summers with at least 5 to 6 months of frost-free weather, outdoor growing is genuinely accessible for a first timer. The main failure points are watering neglect, pest pressure, and harvesting too late in the season.
Indoor Growing
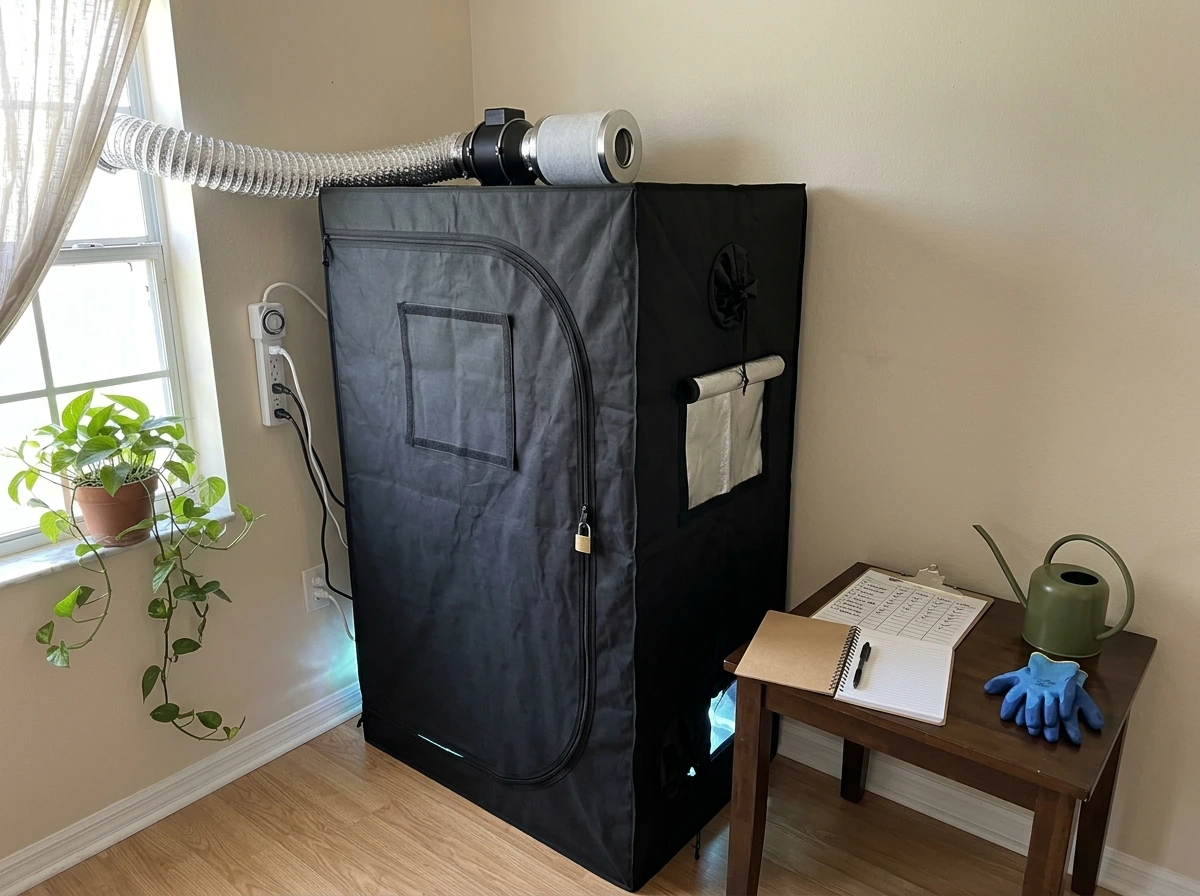
Indoor growing is the most common choice for home cultivators because it gives you year-round control and privacy. The trade-off is that you are replacing everything the outdoor environment provides: light, fresh air, temperature regulation, and humidity management. That is manageable, but it means more equipment, more variables to monitor, and more things that can go wrong. The upside is that once your setup is dialed in, indoor growing produces very consistent, high-quality results. Most beginners start here with a small grow tent, a decent LED light, and a ventilation fan. It is not hard, but it does require attention.
Hydroponic Growing
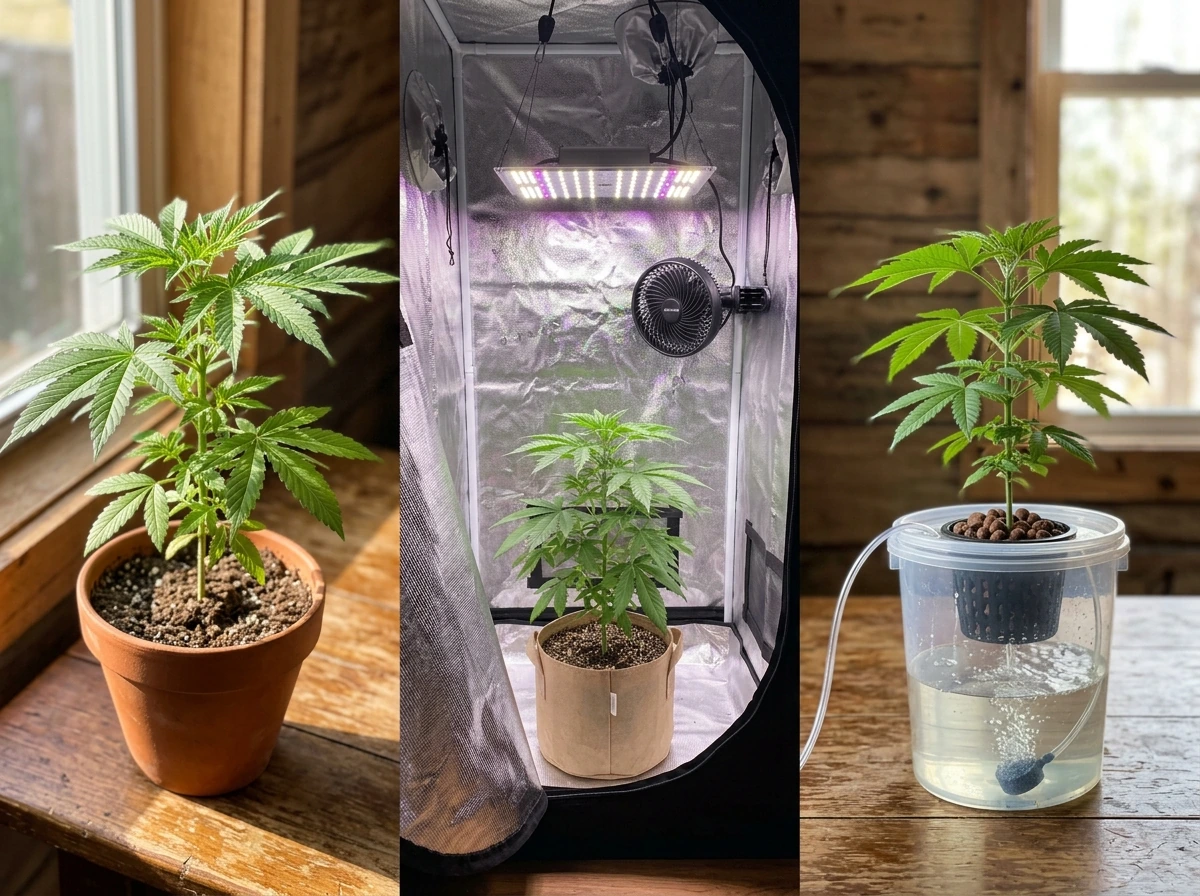
Hydroponics grows cannabis in a nutrient-rich water solution rather than soil. The plants can grow faster and yield more, but you are managing a system with no soil buffer at all. pH swings, nutrient imbalances, and pump failures have immediate effects because there is no medium to slow things down. Beginners who choose hydroponics should start with a simple system like deep water culture rather than a complex recirculating setup, and they need to get comfortable monitoring pH and EC (electrical conductivity, a measure of nutrient strength) daily. Coco coir is a middle ground: it is a soilless medium that behaves somewhat like hydroponics but gives you a bit more room for error and is a popular step-up from soil.
| Method | Difficulty | Startup Cost | Control Level | Best For |
|---|---|---|---|---|
| Outdoor Soil | Easiest | Low ($50–$200) | Low (sun-dependent) | First-timers in good climates |
| Indoor Soil/Coco | Moderate | Medium ($200–$600+) | High | Year-round growers, most climates |
| Hydroponics | Most Technical | Medium-High ($300–$800+) | Very High | Growers ready to learn a system |
My honest recommendation for most beginners: start with a small indoor soil or coco setup, one to three plants in a 2x2 or 3x3 tent. You will learn the full grow cycle in a controlled space without betting everything on weather, and soil gives you more forgiveness than hydro while you are getting your footing.
What to Expect: Time, Cost, and Skill Level
A realistic seed-to-harvest timeline for an indoor photoperiod strain runs roughly 4 to 5 months from germination. Seedling and vegetative stages together take about 4 to 8 weeks depending on how big you want the plant before flipping to flower. Flowering itself takes 8 to 14 weeks depending on genetics, with indica-leaning strains often finishing closer to 8 to 10 weeks and sativa-leaning strains running longer. After harvest, you need a drying and curing period of at least 2 to 4 weeks before the product is at its best. Autoflowering strains, which do not depend on a light schedule change to flower, can cut the total timeline to roughly 10 to 14 weeks from seed, making them a popular beginner choice.
For cost, a basic indoor setup including a small grow tent, LED light, ventilation fan, soil, pots, nutrients, and seeds will run you roughly $200 to $600 depending on quality. Hydroponics adds system costs. Outdoor growing is the cheapest entry point. Ongoing costs are mostly nutrients, electricity (for indoor), and replacement supplies. The learning investment is real but finite. Most growers say their second grow is dramatically better than their first, and by the third grow most of the core skills feel natural.
Skill level required at the start: basic. You need to be able to read a pH meter, follow a watering schedule, and pay attention to your plants every day or two. You do not need any horticulture background. The learning curve is steepest in the first two to three weeks as you get your environment dialed in, and again in late flower when plant stress and pest or mold pressure peak.
The Variables You Absolutely Must Get Right
Most beginner failures come down to one or more of these four areas. Get these right and you will grow cannabis successfully. Skip or guess at them and you will struggle regardless of how good your seeds are.
Environment: Temperature, Humidity, and Airflow
Cannabis grows best in temperatures between about 70 and 85 degrees Fahrenheit during the light period, dropping a few degrees at night. Humidity matters enormously and changes across the growth stages. During veg, you want relative humidity (RH) around 50 to 70 percent. Once you are deep into flower, you need to bring humidity below 50 percent, and ideally below 45 percent in the last few weeks, because dense buds trap moisture and humidity above 60 percent RH is a major trigger for bud rot and mold. Airflow from a circulation fan and fresh air exchange via an exhaust system are not optional in an indoor tent. Stagnant air is where problems breed.
A more advanced environmental target to know about is VPD, or vapor pressure deficit. VPD measures the relationship between temperature and humidity as the plant actually experiences it. Target VPD ranges commonly used are roughly 0.8 to 1.1 kPa during vegetative growth and 1.1 to 1.4 kPa during flowering. You do not need to master VPD on your first grow, but understanding it helps you make sense of why both temperature and humidity matter together, not just individually.
Lighting
For indoor growing, light is your biggest lever. LED grow lights have become the standard recommendation in 2026 because they run cooler, use less electricity, and the quality options at every price point are much better than they were even five years ago. For a 2x2 tent, a quality LED in the 100 to 150 watt range works well. For a 4x4 tent, you want 400 to 600 watts of actual draw. Photoperiod strains need 18 hours of light and 6 hours of darkness during veg, then a switch to 12/12 to trigger flowering. Autoflowers can be run on 18/6 or even 20/4 light schedules their entire life. Light distance matters too. Too close and you bleach or stress the plant; too far and growth stretches and weakens. Follow the manufacturer's guidelines and watch the plant's response.
pH and Nutrients
This is the area where most beginners make their most avoidable mistakes. Cannabis can only absorb nutrients within a specific pH range. Outside that range, nutrients lock out even when they are present in the water or soil. Target pH varies by medium: for soil aim for 6.2 to 6.7, for coco coir aim for 5.8 to 6.2, and for hydroponics aim for 5.5 to 6.2. A basic digital pH meter (under $20) and pH up/down solutions are non-negotiable pieces of equipment. Check the pH of your water before every feeding.
For nutrients, start simple. A three-part nutrient system with a grow formula, a bloom formula, and a base or micro formula covers most of what the plant needs. Follow the manufacturer's feeding schedule at half the recommended dose to start, then increase based on how the plant responds. Overfeeding is far more common than underfeeding among beginners, and it causes more problems.
Watering
Overwatering is probably the single most common beginner mistake, and it looks deceptively like underwatering because the plant droops in both cases. The rule for soil growing: water thoroughly, then wait until the top inch or two of soil is dry and the pot feels noticeably lighter before watering again. Roots need oxygen as much as water, and constantly wet soil suffocates them. In coco coir, you water more frequently, sometimes daily, because coco does not hold water the same way soil does. In hydroponics, the medium is always wet but the root zone gets oxygen from the water or air stones in the system.
Common Problems and How Hard They Are to Fix
Every grower runs into problems. Here is what you are most likely to encounter and how fixable each one is.
Nutrient Deficiencies and Excesses
Yellowing leaves, discoloration, spots, and curling are usually signs of a nutrient problem or a pH problem that is causing a nutrient lockout. The fix is almost always to (1) check and correct your pH first, (2) flush the growing medium with plain pH-corrected water, and (3) adjust your feeding. These problems are fixable, especially if caught early. They look alarming on a leaf but rarely kill a plant quickly. Fixability rating: moderate, 3 to 7 days to see improvement after correction.
Overwatering and Root Issues
Overwatered plants droop even when the soil is still wet. The fix is simply to let the medium dry out and adjust your watering schedule going forward. Root rot in hydroponics is trickier and requires treating the reservoir with beneficial bacteria or hydrogen peroxide and improving oxygenation. Fixability rating for overwatering: easy once you diagnose it. Root rot in hydro: moderate to hard, and better to prevent than treat.
Mold and Bud Rot
Bud rot (botrytis) is the beginner's nightmare in late flower. Humidity above 60 percent RH, poor airflow, and dense buds create the perfect conditions for it. Once you find it inside a bud, that bud is gone. You cut it out and dispose of it carefully to prevent spores from spreading. Prevention is everything here: keep late-flower humidity below 50 percent, run fans continuously, and inspect buds regularly. Fixability rating: hard once established, easy to prevent.
Pests
Spider mites, fungus gnats, aphids, and thrips are the most common cannabis pests. Fungus gnats love overwatered soil. Spider mites thrive in hot, dry conditions. Most pest infestations caught early are manageable with neem oil, insecticidal soap, beneficial insects, or sticky traps. Fixability rating: easy to moderate if caught early, hard if they explode in late flower when you have limited treatment options.
| Problem | How Common | Fixability | Key Prevention |
|---|---|---|---|
| Nutrient lockout/deficiency | Very common | Moderate (days to resolve) | Monitor and correct pH every watering |
| Overwatering | Very common | Easy (let it dry out) | Lift the pot to judge weight before watering |
| Bud rot/mold | Common in late flower | Hard once present | Keep RH below 50% and run fans |
| Spider mites | Moderate | Moderate if caught early | Inspect leaves weekly, keep humidity in range |
| Fungus gnats | Common in soil | Easy to moderate | Avoid overwatering, use sticky traps |
| Nutrient burn (overfeeding) | Very common | Easy (flush and reduce dose) | Start at half the recommended feeding dose |
Your Beginner Starter Plan: What to Do Next
Here is a practical, step-by-step path to your first successful grow. This is roughly what I would tell someone who just decided they want to try this and wants to start in the next few weeks.
- Confirm your local laws first. Check whether home cultivation is legal where you live, how many plants are allowed, and what secure-storage requirements apply. This is not optional. If you are in a state like Texas where it remains illegal, you need to know that before anything else. Other guides on this site cover specific state rules in detail.
- Choose your method. For most beginners, a small indoor soil or coco grow in a 2x2 or 3x3 tent is the best starting point. It is controlled, private, and forgiving. If you live in a warm climate and have outdoor space, an outdoor soil grow is also a great low-cost entry.
- Get your core equipment. For indoor: a grow tent, an LED light appropriately sized for your space, an exhaust fan with carbon filter, a small circulation fan, fabric pots, quality potting mix or coco coir, a pH meter, pH up/down solution, and a basic nutrient kit. Budget roughly $300 to $500 for a solid beginner setup.
- Pick a beginner-friendly strain. Autoflowering strains are excellent for first-timers because they have a shorter, predictable life cycle and do not require a light schedule change to flower. Look for strains described as robust, mold-resistant, or beginner-recommended. indica-dominant and hybrid autoflowers in the 10 to 12 week range are a sweet spot.
- Germinate your seeds and get seedlings established. A simple paper towel method works fine. Once the tap root appears, move to your starter medium. Keep humidity high (around 65 to 70 percent) and light intensity lower during the seedling stage. Do not fertilize until you see the third or fourth set of true leaves.
- Monitor your environment daily. Invest in a basic digital thermometer and hygrometer. Keep temperatures in the 70 to 82 degrees Fahrenheit range during the light period. Adjust humidity by growth stage. Check pH every time you water. These small daily habits are the entire difference between a thriving plant and a struggling one.
- Follow a watering schedule tied to medium dryness, not a calendar. Water thoroughly, let the pot dry out appropriately for your medium, then water again. Check for pests weekly by inspecting the undersides of leaves.
- Plan your flower-to-harvest window. When you flip to 12/12 (for photoperiod strains) or when your autoflower enters flower naturally, start tracking weeks. Use a jeweler's loupe or digital microscope to check trichome color near harvest: cloudy white trichomes mean peak potency; amber trichomes mean a more sedating effect. Most beginners harvest a bit early, which is fine for a first run.
- Dry and cure your harvest properly. Hang cut branches in a dark space at around 60 to 65 degrees Fahrenheit and 55 to 60 percent RH for 7 to 14 days. Then trim and cure in glass jars, burping them daily for the first two weeks. This step dramatically improves the final quality and is often rushed by impatient first-timers.
The bottom line on difficulty: <a href="BBB79359-11DB-4A24-A4BD-9ADB51CC860C">growing pot</a> is learnable, practical, and genuinely rewarding. The first grow will have a few rough patches. Something will look wrong, you will panic, and you will figure it out. That is normal, and it is how you get to your second grow, which will be noticeably better. The plant wants to grow. Your job is just to give it the right environment and get out of its way.
FAQ
How hard is it to grow pot for a complete beginner, really, and what’s the “minimum effort” version of that?
For most people, the difficulty is closer to “houseplant plus daily checks” than “master horticulture,” if you start simple: one small tent, one LED, plain soil or coco, and a consistent routine. The true minimum effort plan is to run fewer variables, check pH and humidity on schedule, and avoid changing more than one thing at a time when something looks off.
What’s the biggest reason first-time grows fail, beyond general inexperience?
The most common specific failure pattern is getting moisture wrong (especially overwatering in soil) and then chasing it by repeatedly adjusting the schedule. If the top layer is still wet and you water again, you can lose oxygen to the roots quickly, which then triggers nutrient uptake problems that look like deficiencies.
Is outdoor actually easier, or can outdoor be harder because of weather and pests?
Outdoor can be easier to start because you do less lighting and pH micromanaging, but it becomes harder in regions with high humidity, heavy rain, or early frost. If your summers are muggy, you may need extra effort for airflow, pest control, and careful harvest timing to avoid mold and bud rot.
How precise do I need to be with pH, and what happens if I’m a little off?
You do not need lab-level precision, but you do need to stay within the medium’s usable range. Consistently drifting outside the target window can cause nutrient lockout even if you are feeding correctly, leading to recurring yellowing or odd leaf patterns that keep returning until pH is corrected.
Do I need VPD, or can I ignore it on my first grow?
You can ignore VPD for the first run if you reliably hit basic temperature and RH targets. VPD becomes useful when you notice that two setups with the same RH behave differently, or when you are trying to fine-tune humidity to prevent mold in late flower.
How much daily time does a beginner actually need to spend on it?
Expect about 5 to 15 minutes per day for checks (plants, tent conditions, and quick observations) plus a longer session for watering, training, or adjustments as needed. If you can only do a quick look once a week, indoor becomes significantly harder because humidity spikes and pest outbreaks can start and expand between checks.
What’s a safe watering approach for soil if I’m unsure when to water?
Use a “thorough then wait” routine: water until it drains, then wait until the pot feels meaningfully lighter and the top inch or two is dry. If you rely only on the surface drying, you can still keep the root zone too wet, especially in fabric pots or larger containers.
If I notice yellow leaves, do I flush immediately, or is there a better first step?
Start with diagnosis, pH first. Correct the nutrient solution and check medium pH before you flush, because flushing without fixing pH can reset the cycle and delay improvement. If the yellowing is spreading quickly or you see severe symptoms, then a pH-corrected flush can be helpful, but do it after verifying pH.
What’s the best way to prevent bud rot if I’m growing indoors?
Prevention is mostly about late-flower humidity control, continuous airflow, and inspection. Keep RH under your late-flower target (especially below about 50%), avoid letting dense buds sit in still air, and remove affected buds immediately while preventing spores from spreading to unaffected areas.
Are autoflowers truly easier, or do they just shorten the timeline?
Autoflowers can be easier because you avoid managing light schedule changes, but they still require correct environment and consistent feeding. The main trade-off is less room to recover from early stress, so mistakes in watering, lighting distance, or temperature can show up sooner.
Can I switch grow methods after I start, like from soil to hydro or coco?
It’s usually a bad idea mid-grow because transplanting changes the root environment and can shock the plant. If you want to change methods, plan it before germination, so you can set the correct pH targets, watering frequency, and nutrient approach from day one.
What equipment is hardest to skip, and what can I safely postpone?
Non-negotiables are a reliable pH meter for your medium and a way to control and measure basic environment (at minimum temp and humidity). You can sometimes postpone more advanced metrics like VPD, but if you skip airflow or exhaust for an enclosed indoor space, you increase the chance of mold and pest problems quickly.
Next Article
How to Grow Weed Legally in Florida: Medical Steps
Florida medical cannabis guide: legality, registration, plant limits, security, and seed-to-harvest steps for beginners.